NOTE
6.15 CompletableFuture
1. 是什么 用于异步编程。(准备说是非阻塞) Java中所谓的异步编程其实就是把阻塞的代码放在一个单独的线程中执行,并且有结果时会通知主线程 2. Future VS CompletableFutre Future CompletableFutre ------------------ -----
这是历史学习笔记,可能存在过时或不完整的理解。
1. 是什么
用于异步编程。(准备说是非阻塞) Java中所谓的异步编程其实就是把阻塞的代码放在一个单独的线程中执行,并且有结果时会通知主线程
2. Future VS CompletableFutre
| Future | CompletableFutre | |
|---|---|---|
| 结果获取方式 | 主动轮询。使用isDone来检查调用是否完成,get用来获取执行的结果 | 异步回调。使用回调函数 |
| 异常处理 | 不支持 | 支持 |
| 链式调用 | 不支持 | 支持 |
| 可以手动完成一个任务 | 不支持 | 支持 |
3. 使用
3.1. 运行一个不返回结果的任务
CompletableFuture<Void> future = CompletableFuture.runAsync(() -> {
        try
        {
            TimeUnit.SECONDS.sleep(5);
        }
        catch (InterruptedException e)
        {
            throw new IllegalStateException(e);
        }
        System.out.println("后台任务完成");
    });

    future.get();
3.2. 运行一个返回结果的任务
CompletableFuture<String> future = CompletableFuture.supplyAsync(() -> {
        try
        {
            TimeUnit.SECONDS.sleep(5);
        }
        catch (InterruptedException e)
        {
            throw new IllegalStateException(e);
        }
       return "后台任务完成";
    });

    String s = future.get();
    System.out.println(s);
3.3. 线程池
默认使用ForkJoin的commonpool里的线程池执行任务,但是也可以使用Executor作为第二个参数指定运行的线程池
Executor executor = Executors.newFixedThreadPool(10);
CompletableFuture<String> future = CompletableFuture.supplyAsync(() -> {
try {
    TimeUnit.SECONDS.sleep(1);
} catch (InterruptedException e) {
    throw new IllegalStateException(e);
}
return "Result of the asynchronous computation";
}, executor);
3.4. 手动完成任务
CompletableFuture<String> stringCompletableFuture = new CompletableFuture<>();

    new Thread(()->{
        try
        {
            TimeUnit.SECONDS.sleep(5);
        }
        catch (InterruptedException e)
        {
            e.printStackTrace();
        }

       stringCompletableFuture.complete("手动完成任务");
    }).run();

    String s = stringCompletableFuture.get();
    System.out.println(s);
3.5. 回调
- thenApply() 接受结果作为参数,有返回
- thenAccept() 接受结果作为参数,无返回
- thenRun() 无参数,无返回
System.out.println("start");
    CompletableFuture<String> future = CompletableFuture.supplyAsync(() -> {
        try
        {
            TimeUnit.SECONDS.sleep(5);
        }
        catch (InterruptedException e)
        {
            throw new IllegalStateException(e);
        }
        return "后台任务完成";
    });

    future.thenAccept(System.out::println);

    System.out.println("主线程继续执行并且休眠10s");

    TimeUnit.SECONDS.sleep(10);
3.6. 链式调用
System.out.println("start");
    CompletableFuture<String> future = CompletableFuture.supplyAsync(() -> {
        try
        {
            TimeUnit.SECONDS.sleep(5);
        }
        catch (InterruptedException e)
        {
            throw new IllegalStateException(e);
        }
        return "后台任务完成";
    });

    future.thenApply(s->{
        System.out.println(Thread.currentThread().getName() + "s");
        return s;
    }).thenApply(s->{
        System.out.println(Thread.currentThread().getName() + "s");
        return s;
    });

    System.out.println("主线程继续执行并且休眠10s");

    TimeUnit.SECONDS.sleep(10);
3.7. 组合多个CompletableFuture
- thenCompose() 有依赖的两个Future
- thenCombine() 没有依赖的两个Future
- CompletableFuture.allOf 所有Future完成
- CompletableFuture.anyOf 任意一个Future完成
System.out.println("start runnning............");
    long start = System.currentTimeMillis();
    CompletableFuture<String> future1
            = CompletableFuture.supplyAsync(() ->
            {
                try
                {
                    TimeUnit.SECONDS.sleep(5);
                }
                catch (InterruptedException e)
                {
                    e.printStackTrace();
                }
                System.out.println("Hello" + Thread.currentThread().getName());
                return "Hello";
            }
    );
    CompletableFuture<String> future2
            = CompletableFuture.supplyAsync(() ->
            {
                try
                {
                    TimeUnit.SECONDS.sleep(8);
                }
                catch (InterruptedException e)
                {
                    e.printStackTrace();
                }
                System.out.println("Beautiful" + Thread.currentThread().getName());

                return "Beautiful";
            }
    );
    CompletableFuture<String> future3
            = CompletableFuture.supplyAsync(() ->
            {
                try
                {
                    TimeUnit.SECONDS.sleep(10);
                }
                catch (InterruptedException e)
                {
                    e.printStackTrace();
                }
                System.out.println("World" + Thread.currentThread().getName());

                return "World";
            }
    );

    CompletableFuture<Void> combinedFuture
            = CompletableFuture.allOf(future1, future2, future3);


    combinedFuture.get();

    long end = System.currentTimeMillis();

    System.out.println("finish run...time is " + (end-start));

    assertTrue(future1.isDone());
    assertTrue(future2.isDone());
    assertTrue(future3.isDone());

    System.out.println(future1.get());
    System.out.println(future2.get());
    System.out.println(future3.get());
3.8. 异常处理
- exceptionally发生异常的时候调用
- handle无论发生异常与否都调用
CompletableFuture<Object> future = CompletableFuture.supplyAsync(() -> {
            throw new IllegalArgumentException("Age can not be negative");
    }).exceptionally(ex -> {
        System.out.println("Oops! We have an exception - " + ex.getMessage());
        return "Unknown!";
    });

System.out.println(future.get());
4. 源码分析
4.1. 类图
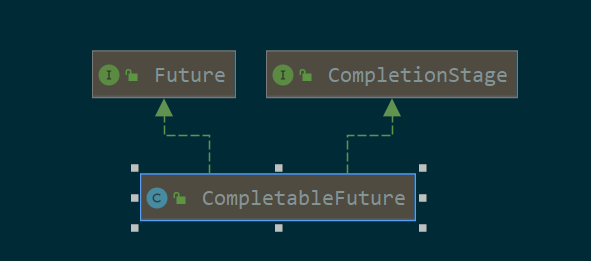
可以看出CompletableFuture实现了Future接口,因此这玩意也是一个可以获取异步执行结果的接口
4.2. 属性
volatile Object result;       // Either the result or boxed AltResult
volatile Completion stack; // Top of Treiber stack of dependent actions运行的结果存在Object result,如果发生了异常那么封装在AltResult
4.2.1. AltResult
static final class AltResult { // See above
    final Throwable ex;        // null only for NIL
    AltResult(Throwable x) { this.ex = x; }
}

/** The encoding of the null value. */
static final AltResult NIL = new AltResult(null);
4.3. runAsync
public static CompletableFuture<Void> runAsync(Runnable runnable) {
    return asyncRunStage(asyncPool, runnable);
}
传入asyncPool和runnable任务调用asyncRunStage方法
我们先看看asyncPool是怎么初始化的
4.3.1. 初始化默认的线程池
//返回true
private static final boolean useCommonPool =
    (ForkJoinPool.getCommonPoolParallelism() > 1);
//这里使用的是ForkJoinPool.commonPool()
private static final Executor asyncPool = useCommonPool ?
ForkJoinPool.commonPool() : new ThreadPerTaskExecutor();所以默认使用的是ForkJoinPool.commonPool()
有了默认的线程池,接下来调用的asyncRunStage方法
- asyncRunStage
static CompletableFuture<Void> asyncRunStage(Executor e, Runnable f) {
    if (f == null) throw new NullPointerException();
    CompletableFuture<Void> d = new CompletableFuture<Void>();
    e.execute(new AsyncRun(d, f));
    return d;
}- 2行:任务为空那么抛出异常
- 3行:构造CompletableFuture,用于接收结果
- 4行:先用CompletableFuture和Runnable构造AsyncRun,接口调用线程池Executor的execute方法执行这个AsyncRun
- 5行:返回CompletableFuture
4.3.2. 把执行的任务【Runnable】和接收结果【CompletableFuture】封装到AsyncRun
先看看AsyncRun类
- AsyncRun
static final class AsyncRun extends ForkJoinTask<Void>
        implements Runnable, AsynchronousCompletionTask {
    CompletableFuture<Void> dep; Runnable fn;
    AsyncRun(CompletableFuture<Void> dep, Runnable fn) {
        this.dep = dep; this.fn = fn;
    }

    public final Void getRawResult() { return null; }
    public final void setRawResult(Void v) {}
    public final boolean exec() { run(); return true; }

    public void run() {
        CompletableFuture<Void> d; Runnable f;
        if ((d = dep) != null && (f = fn) != null) {
            //清空CompletableFuture和Runnable
            dep = null; fn = null;
            //如果CompletableFuture的结果为空
            if (d.result == null) {
                try {
                    //那么执行Runnable方法
                    f.run();
                    //CAS设置CompletableFuture的结果为AltResult NIL--详见上面的AltResult
                    d.completeNull();
                } catch (Throwable ex) {
                    //抛出了异常则CAS设置CompletableFuture的结果为AltResult(异常)--详见上面的AltResult
                    d.completeThrowable(ex);
                }
            }
            d.postComplete();
        }
    }
}- 2行:实现了Runnable接口
- 4-6行:构造方法只是保存了传进来的Runnable和CompletableFuture
- 12-26行:线程池的execute方法最终会调用这个run方法。详细说明见注释。
我们可以看看设置null结果和异常结果的方法
- completeNull【null】
final boolean completeNull() {
    //CAS设置RESULT为NIL
    return UNSAFE.compareAndSwapObject(this, RESULT, null,
                                       NIL);
}- completeThrowable【异常】
static AltResult encodeThrowable(Throwable x) {
    return new AltResult((x instanceof CompletionException) ? x :
                         new CompletionException(x));
}

/** Completes with an exceptional result, unless already completed. */
final boolean completeThrowable(Throwable x) {
    //CAS设置RESULT为AltResult(异常)
    return UNSAFE.compareAndSwapObject(this, RESULT, null,
                                       encodeThrowable(x));
}
4.3.3. 调用线程池的execute方法执行上面的AsyncRun
执行AsyncRun的时候最终会调用AsyncRun的run方法,分析如上面的把执行的任务【Runnable】和接收结果【CompletableFuture】封装到AsyncRun
4.4. supplyAsync
public static <U> CompletableFuture<U> supplyAsync(Supplier<U> supplier) {
    return asyncSupplyStage(asyncPool, supplier);
}
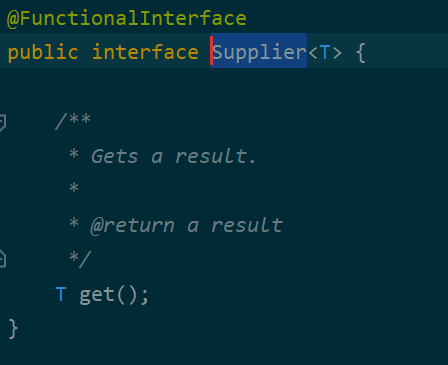
传入默认的线程池asyncPool和任务supplier,这个supplier是Supplier【函数式接口】,如下图:
4.4.1. 初始化默认的线程池
初始化默认的线程池跟上面的runAsync一样
我们接着跟踪asyncSupplyStage方法
- asyncSupplyStage
static <U> CompletableFuture<U> asyncSupplyStage(Executor e,
                                                 Supplier<U> f) {
    if (f == null) throw new NullPointerException();
    CompletableFuture<U> d = new CompletableFuture<U>();
    e.execute(new AsyncSupply<U>(d, f));
    return d;
}- 2行:任务为空那么抛出异常
- 3行:构造CompletableFuture,用于接收结果
- 4行:先用CompletableFuture和Supplier构造AsyncSupply,接口调用线程池Executor的execute方法执行这个AsyncSupply
- 5行:返回CompletableFuture
4.4.2. 把执行的任务【Supplier】和接收结果【CompletableFuture】封装到AsyncSupply
- AsyncSupply
static final class AsyncSupply<T> extends ForkJoinTask<Void>
        implements Runnable, AsynchronousCompletionTask {
    CompletableFuture<T> dep; Supplier<T> fn;
    AsyncSupply(CompletableFuture<T> dep, Supplier<T> fn) {
        this.dep = dep; this.fn = fn;
    }

    public final Void getRawResult() { return null; }
    public final void setRawResult(Void v) {}
    public final boolean exec() { run(); return true; }

    public void run() {
        CompletableFuture<T> d; Supplier<T> f;
        if ((d = dep) != null && (f = fn) != null) {
            //清空CompletableFuture和Runnable
            dep = null; fn = null;
            //如果CompletableFuture的结果为空
            if (d.result == null) {
                try {
                    //调用Supplier.get获取结果
                    //然后调用CompletableFuture.completeValue把结果设置进
                    d.completeValue(f.get());
                } catch (Throwable ex) {
                    //抛出了异常则CAS设置CompletableFuture的结果为AltResult(异常)--详见上面的AltResult
                    d.completeThrowable(ex);
                }
            }
            d.postComplete();
        }
    }
}- 2行:实现了Runnable接口
- 4-6行:构造方法只是保存了传进来的Runnable和CompletableFuture
- 12-26行:线程池的execute方法最终会调用这个run方法。详细说明见注释。
我们可以看看设置结果的completeValue方法
- completeValue
final boolean completeValue(T t) {
    return UNSAFE.compareAndSwapObject(this, RESULT, null,
                                       (t == null) ? NIL : t);
}
4.4.3. 调用线程池的execute方法执行上面的AsyncRun
执行AsyncRun的时候最终会调用AsyncRun的run方法,分析如上面的把执行的任务【Supplier】和接收结果【CompletableFuture】封装到AsyncSupply
4.5. complete
public boolean complete(T value) {
    boolean triggered = completeValue(value);
    postComplete();
    return triggered;
}- 2行:手动设置结果
- 3行:执行钩子方法
4.5.1. 手动设置结果
final boolean completeValue(T t) {
    return UNSAFE.compareAndSwapObject(this, RESULT, null,
                                       (t == null) ? NIL : t);
}
4.5.2. 执行钩子方法
这段代码确定没看懂要干啥
final void postComplete() {
    /*
     * On each step, variable f holds current dependents to pop
     * and run.  It is extended along only one path at a time,
     * pushing others to avoid unbounded recursion.
     */
    CompletableFuture<?> f = this; Completion h;
    while ((h = f.stack) != null ||
           (f != this && (h = (f = this).stack) != null)) {
        CompletableFuture<?> d; Completion t;
        if (f.casStack(h, t = h.next)) {
            if (t != null) {
                if (f != this) {
                    pushStack(h);
                    continue;
                }
                h.next = null;    // detach
            }
            f = (d = h.tryFire(NESTED)) == null ? this : d;
        }
    }
}