NOTE
2.66 添加删除ChannelHandler
1. 添加handler - DefaultChannelPipeline#addLast 1.1. 判断是否重复添加 - checkMultiplicity 1.2. 创建节点并添加至链表 - newContext - DefaultChannelHandlerContext - addLast0
这是历史学习笔记,可能存在过时或不完整的理解。
1. 添加handler
- DefaultChannelPipeline#addLast
public final ChannelPipeline addLast(EventExecutorGroup group, String name, ChannelHandler handler) {
    final AbstractChannelHandlerContext newCtx;
    synchronized (this) {
    	//判断是否重复添加
        checkMultiplicity(handler);

		//创建节点并添加至链表
        newCtx = newContext(group, filterName(name, handler), handler);

        addLast0(newCtx);


        if (!registered) {
            newCtx.setAddPending();
            callHandlerCallbackLater(newCtx, true);
            return this;
        }

        EventExecutor executor = newCtx.executor();
        if (!executor.inEventLoop()) {
            newCtx.setAddPending();
            executor.execute(new Runnable() {
                @Override
                public void run() {
                	////回调添加完成事件
                    callHandlerAdded0(newCtx);
                }
            });
            return this;
        }
    }
    callHandlerAdded0(newCtx);
    return this;
}
1.1. 判断是否重复添加
- checkMultiplicity
private static void checkMultiplicity(ChannelHandler handler) {
    if (handler instanceof ChannelHandlerAdapter) {
        ChannelHandlerAdapter h = (ChannelHandlerAdapter) handler;
		//非共享的【是指不是每个channel都有一个】 并且 没有添加过
        if (!h.isSharable() && h.added) {
        	//抛出异常
            throw new ChannelPipelineException(
                    h.getClass().getName() +
                    " is not a @Sharable handler, so can't be added or removed multiple times.");
        }
        //标记为已添加
        h.added = true;
    }
}
1.2. 创建节点并添加至链表
- newContext
private AbstractChannelHandlerContext newContext(EventExecutorGroup group, String name, ChannelHandler handler) {
	//调用DefaultChannelHandlerContext
    return new DefaultChannelHandlerContext(this, childExecutor(group), name, handler);
}- DefaultChannelHandlerContext
DefaultChannelHandlerContext(
        DefaultChannelPipeline pipeline, EventExecutor executor, String name, ChannelHandler handler) {
    super(pipeline, executor, name, isInbound(handler), isOutbound(handler));
    if (handler == null) {
        throw new NullPointerException("handler");
    }
    this.handler = handler;
}- addLast0
private void addLast0(AbstractChannelHandlerContext newCtx) {
	//添加到尾巴前面
    AbstractChannelHandlerContext prev = tail.prev;
    newCtx.prev = prev;
    newCtx.next = tail;
    prev.next = newCtx;
    tail.prev = newCtx;
}
1.3. 回调添加完成事件
- callHandlerAdded0
private void callHandlerAdded0(final AbstractChannelHandlerContext ctx) {
    try {

        ctx.setAddComplete();
		//回调到用户代码io.netty.channel.ChannelInitializer#handlerAdded
        ctx.handler().handlerAdded(ctx);
    //。。。。。。。。。
}- io.netty.channel.ChannelInitializer#handlerAdded
public void handlerAdded(ChannelHandlerContext ctx) throws Exception {
    if (ctx.channel().isRegistered()) {
        // This should always be true with our current DefaultChannelPipeline implementation.
        // The good thing about calling initChannel(...) in handlerAdded(...) is that there will be no ordering
        // surprises if a ChannelInitializer will add another ChannelInitializer. This is as all handlers
        // will be added in the expected order.
        initChannel(ctx);
    }
}- initChannel
private boolean initChannel(ChannelHandlerContext ctx) throws Exception {
    if (initMap.putIfAbsent(ctx, Boolean.TRUE) == null) { // Guard against re-entrance.
        try {
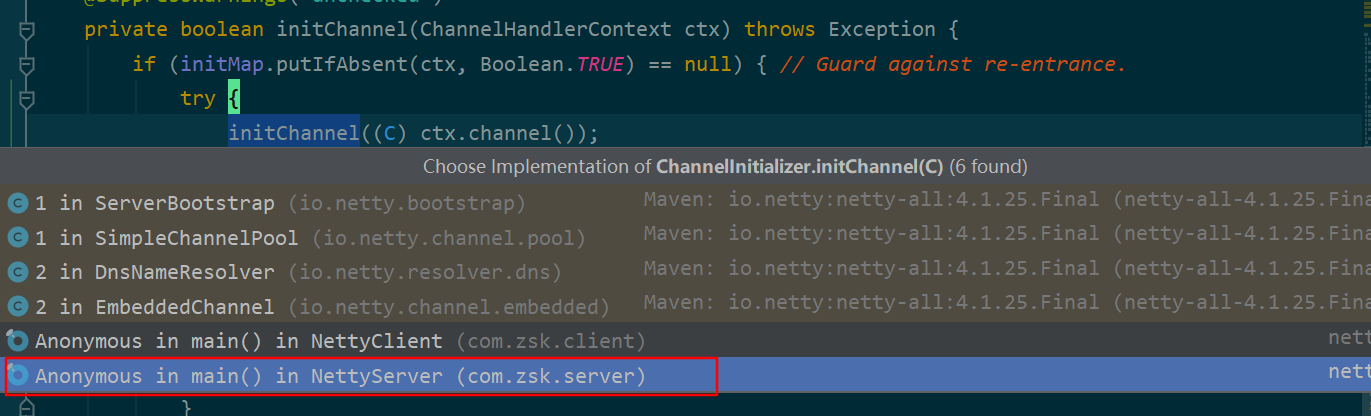
			//回调到用户代码,如下图
            initChannel((C) ctx.channel());
        } catch (Throwable cause) {
            // Explicitly call exceptionCaught(...) as we removed the handler before calling initChannel(...).
            // We do so to prevent multiple calls to initChannel(...).
            exceptionCaught(ctx, cause);
        } finally {
            remove(ctx);
        }
        return true;
    }
    return false;
}
2. 删除handler
2.1. 使用场景
比如用户验证密码完毕之后,需要把handler删除
- remove
public final ChannelPipeline remove(ChannelHandler handler) {
    remove(getContextOrDie(handler));
    return this;
}
先通过getContextOrDie找到相应的节点,然后调用remove方法删除该节点
2.2. 找到节点
private AbstractChannelHandlerContext getContextOrDie(ChannelHandler handler) {
    AbstractChannelHandlerContext ctx = (AbstractChannelHandlerContext) context(handler);
    if (ctx == null) {
        throw new NoSuchElementException(handler.getClass().getName());
    } else {
        return ctx;
    }
}
调用context找到节点后转换成AbstractChannelHandlerContext返回,如果为null的话会抛出NoSuchElementException异常
- context
public final ChannelHandlerContext context(ChannelHandler handler) {
    if (handler == null) {
        throw new NullPointerException("handler");
    }

    AbstractChannelHandlerContext ctx = head.next;
    for (;;) {

        if (ctx == null) {
            return null;
        }

        if (ctx.handler() == handler) {
            return ctx;
        }

        ctx = ctx.next;
    }
}
其实就是从head开始遍历,一直找到handler() == handler的节点返回
2.3. 删除节点
private AbstractChannelHandlerContext remove(final AbstractChannelHandlerContext ctx) {
    assert ctx != head && ctx != tail;

	//需要加锁
    synchronized (this) {
        remove0(ctx);

        // If the registered is false it means that the channel was not registered on an eventloop yet.
        // In this case we remove the context from the pipeline and add a task that will call
        // ChannelHandler.handlerRemoved(...) once the channel is registered.
        if (!registered) {
            callHandlerCallbackLater(ctx, false);
            return ctx;
        }

        EventExecutor executor = ctx.executor();
        if (!executor.inEventLoop()) {
            executor.execute(new Runnable() {
                @Override
                public void run() {
                    callHandlerRemoved0(ctx);
                }
            });
            return ctx;
        }
    }
    callHandlerRemoved0(ctx);
    return ctx;
}
删除的时候首先需要加锁,然后调用remove0从链表中移除该节点,最后通过callHandlerRemoved回调handlerRemoved方法
2.3.1. 从链表中移除
private static void remove0(AbstractChannelHandlerContext ctx) {
    AbstractChannelHandlerContext prev = ctx.prev;
    AbstractChannelHandlerContext next = ctx.next;
    prev.next = next;
    next.prev = prev;
}
只是修改指针就行了,由于head和tail肯定不为空,所以操作简化了很多
2.3.2. 回调handlerRemoved方法
private void callHandlerRemoved0(final AbstractChannelHandlerContext ctx) {
    // Notify the complete removal.
    try {
        try {
            ctx.handler().handlerRemoved(ctx);
        } finally {
            ctx.setRemoved();
        }
    } catch (Throwable t) {
        fireExceptionCaught(new ChannelPipelineException(
                ctx.handler().getClass().getName() + ".handlerRemoved() has thrown an exception.", t));
    }
}